Step #1: Expand filesystem and reclaim space
For the remainder of this tutorial I’ll be making the following assumptions:
- You are working with a brand new, fresh install of Raspbian Stretch.
- This is not the first time you have installed OpenCV on the Raspberry Pi using Python virtual environments. If it is, please get your feet wet using one of my introductory OpenCV install guides.
- You are comfortable with the command line and Unix environments.
- You know how to debug CMake output for common errors (Python virtual environment not found, missing Python libraries, etc.).
Again, this tutorial is an advanced guide so I’ll presenting the commands and only providing an explanation if it is pertinent — by and large, you should know what these commands do before you execute them.
The first step is to run, raspi-config and expand your filesystem:
And then reboot your Raspberry Pi:
From there, delete both Wolfram Engine and LibreOffice to reclaim ~1GB of space on your Raspberry Pi:
Step #2: Install dependencies
The following commands will update and upgrade any existing packages, followed by installing dependencies, I/O libraries, and optimization packages for OpenCV:
This entire process should take about 5 minutes.
Note: I added libcanberra-gtk* which grabs the ARM specific GTK to prevent GTK warnings (not errors; warnings) you may encounter when running Python + OpenCV scripts on the Raspberry Pi.
Step #3: Download the OpenCV source code
Next, download the OpenCV source code for both the opencv and opencv_contribrepositories, followed by unarchiving them:
Note: You will need to click the “<=>” button in the toolbar of the codeblock above to grab the full paths to the zip archives.
For this blog post, we’ll be using OpenCV 3.3; however, as newer versions of OpenCV are released you can update the corresponding version numbers.
Step #4: Create your Python virtual environment and install NumPy
We’ll be using Python virtual environments, a best practice when working with Python.
You can install pip, virtualenv, and virtualenvwrapper using the following commands:
Once both virtualenv and virtualenvwrapper have been installed, open up your~/.profile and append the following lines to the bottom of the file, using your favorite terminal-based text editor such as vim , emacs , or nano :
From there, reload your ~/.profile file to apply the changes to your current bash session:
You’ll need to run source ~/.profile each time you open a new terminal/SSH into your Pi to ensure your system variables have been set properly (it also loads this file on boot).
Next, create your Python 3 virtual environment:
Here I am creating a Python virtual environment named cv using Python 3 (alternatively, you may also use Python 2.7 by changing the -p switch to python2 ).
You can name the virtual environment whatever you want, but I use cv as the standard naming convention here on PyImageSearch.
Finally, install NumPy into the Python virtual environment:
Step #5: Compile and install the optimized OpenCV library for Raspberry Pi
We’re now ready to compile and install the optimized version of Raspberry Pi.
Ensure you are in the cv virtual environment using the workon command:
And from there configure your build:
Notice how the NEON and VFPV3 flags have been enabled.
If you’re using Python 2.7, your “Python 2” section should look like this:
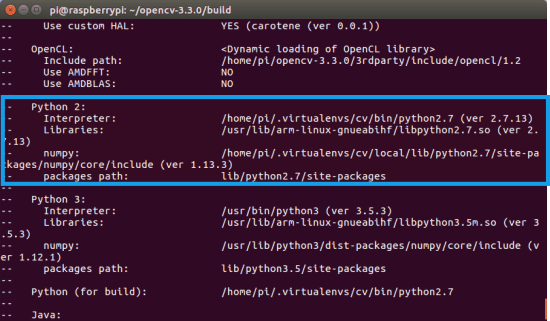
Figure 1: Running CMake to generate the build files for OpenCV 3.3. OpenCV will correctly be built with Python 2.7 and NumPy from our
cv virtualenv.
Otherwise, if you’re compiling OpenCV for Python 3, check the “Python 3” output of CMake:

Figure 2: After running CMake, Python 3 + NumPy are correctly set from within our
cv virtualenv on the Raspberry Pi.
Notice how the Interpreter , Libraries , numpy , and packages path variables have been properly set.
Before you start the compile I would suggest increasing your swap space. This will enable you to compile OpenCV with all four cores of the Raspberry Pi without the compile hanging due to memory exhausting.
Open up your /etc/dphys-swapfile file and then edit the CONF_SWAPSIZE variable:
Notice that I’m increasing the swap from 100MB to 1024MB. This is the secret sauce to compiling OpenCV with multiple cores on the Raspbian Stretch.
If you do not perform this step it’s very likely that your Pi will hang.
From there, restart the swap service:
Note: Increasing swap size is a great way to burn out your Raspberry Pi microSD card. Flash-based storage have limited number of writes you can perform until the card is essentially unable to hold the 1’s and 0’s anymore. We’ll only be enabling large swap for a short period of time, so it’s not a big deal. Regardless, be sure to backup your .img file after installing OpenCV + Python just in case your card dies unexpectedly early. You can read more about large swap sizes corrupting memory cards on this page.
Now that we’ve updated the swap size, kick off the optimized OpenCV compile using all four cores:
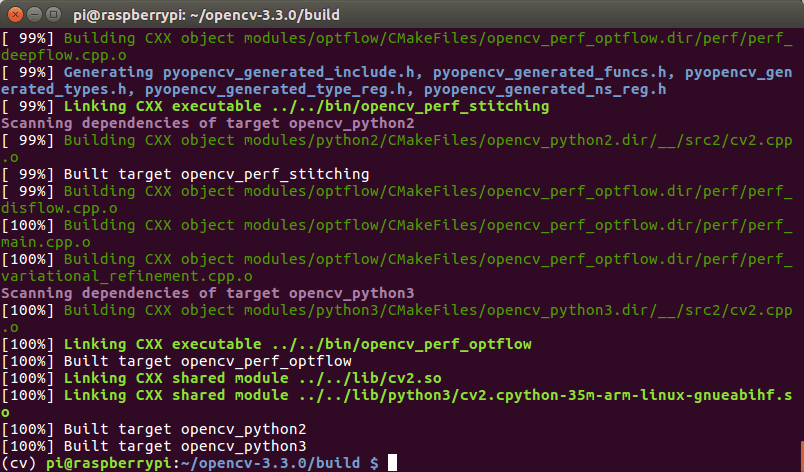
Figure 3: Our optimized compile of OpenCV 3.3 for the Raspberry Pi 3 has been completed successfully.
Assuming OpenCV compiled without error (as in my screenshot above), you can install your optimized version of OpenCV on your Raspberry Pi:
Don’t forget to go back to your /etc/dphys-swapfile file and:
- Reset CONF_SWAPSIZE to 100MB.
- Restart the swap service.
Step #6: Finish installing your optimized OpenCV on the Raspberry Pi
If you compiled OpenCV for Python 3, you need to issue the following commands to sym-link the cv2.so bindings into your cv virtual environment:
Keep in mind that the exact paths will need to be updated depending if you are using Python 3.4, Python 3.5, Python 3.6, etc.
If you instead compiled OpenCV for Python 2.7, you can use these commands to sym-link your cv2.so file into the cv virtual environment:
Step 7: Testing your optimized OpenCV + Raspberry Pi install
As a quick sanity check, access the cv virtual environment, fire up a Python shell and try to import the OpenCV library:
Congratulations! You’ve just installed an optimized OpenCV 3.3 on your Raspberry Pi 3.
So, how good are these optimizations?
Real time
https://github.com/C-Aniruddh/realtime_object_recognition
https://www.raspberrypi.org/forums/viewtopic.php?f=43&t=62364
need to go
$ sudo apt-get install autoconf gettext libtool libjpeg62-dev
$ git clone https://github.com/Distrotech/v4l-utils/tree/distrotech-v4l-utils
$ cd v4l-utils
$ autoreconf -vfi
$ ./configure
$ make
$ sudo make install
$ sudo modprobe bcm2835-v4l2
$ cd cd realtime_object_recognition
sudo python real_time_object_detection.py --prototxt MobileNetSSD_deploy.prototxt.txt --model MobileNetSSD_deploy.caffemodel --source webcam